Mint-fingers
I live in an inner city suburb, about seven kilometres from the CBD (and slightly less to the beach, which is great). Its proximity to the city means it’s a very old suburb that originally had large homesteads with land allocations for farming, which has been subdivided and filled in over the years. The local primary school started in 1861 not long after the first Europeans arrived in South Australia in 1836, the church down the road had the first part built in 1847, and the house next door is one of the original homesteads built in 1863.
As such the area is an eclectic mix, having very old historic buildings, a majority of houses that were built probably around the 1950s and ‘60s, a couple of light industrial areas and modern places not more than about 10 years old. The latter are part of the urban renewal and infill that is happening, where the ‘50s and ‘60s vintage homes on large 1000m2 blocks (1⁄4 acre) get knocked down and replaced with three or four modern residences, usually two-storey.
The house on the east side of us (not the 1863 one) has become a victim and was knocked down a few months ago. There was a very large ironbark tree in the backyard that shaded our small garden for much of the day, and the birds loved. I was sorry to see it go, but the offset benefit has been that our garden, including my herb patch, has gone crazy with all the extra sunlight. The oregano, parsley, thyme and the miniature bay tree have flourished, and the mint has spread like wildfire.
I really love mint, and because I cook a lot of Middle Eastern food it’s quite an essential ingredient. Unfortunately the larvae of Pieris rapae (that’s a green caterpillar to you, from the white cabbage butterfly) apparently likes mint even more than me.
 Check your mint for unwanted protein before use.
I try not to use sprays but rather go and hunt and gather on a daily basis, but inevitably my mint looks a bit chewed. Note my careful avoidance of the words chemical and toxic in relation to sprays, because everything is a chemical and toxicity is about dose. Even water is toxic in sufficient quantities.
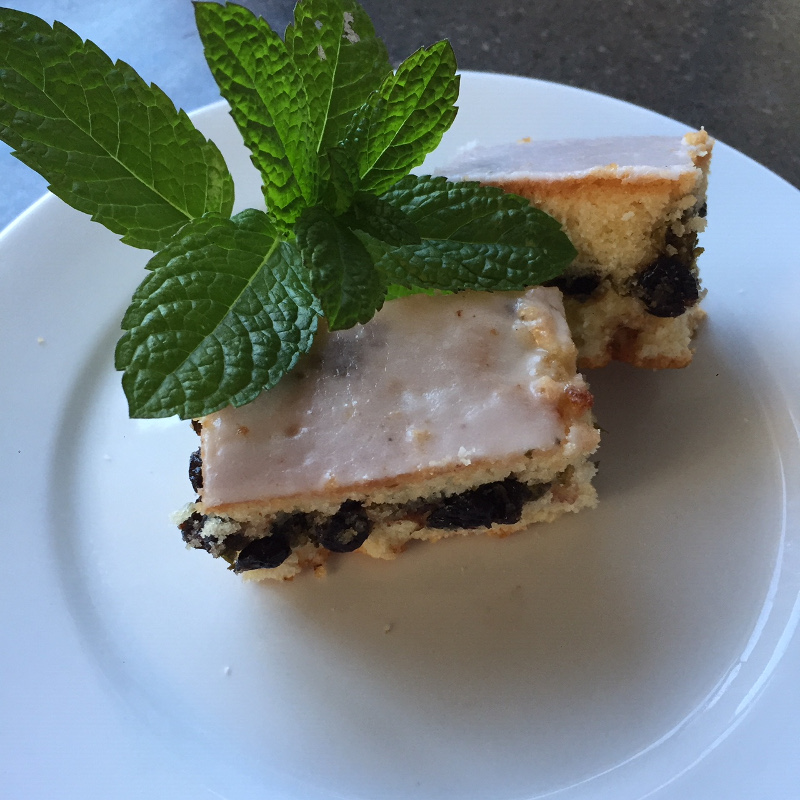
When you have a surplus of mint, there’s no better way to use some up than to make mint fingers. This was my Mum’s recipe – I asked her for it a couple of times which, quaintly, she did by handwriting it out and sending it to me via snail mail.
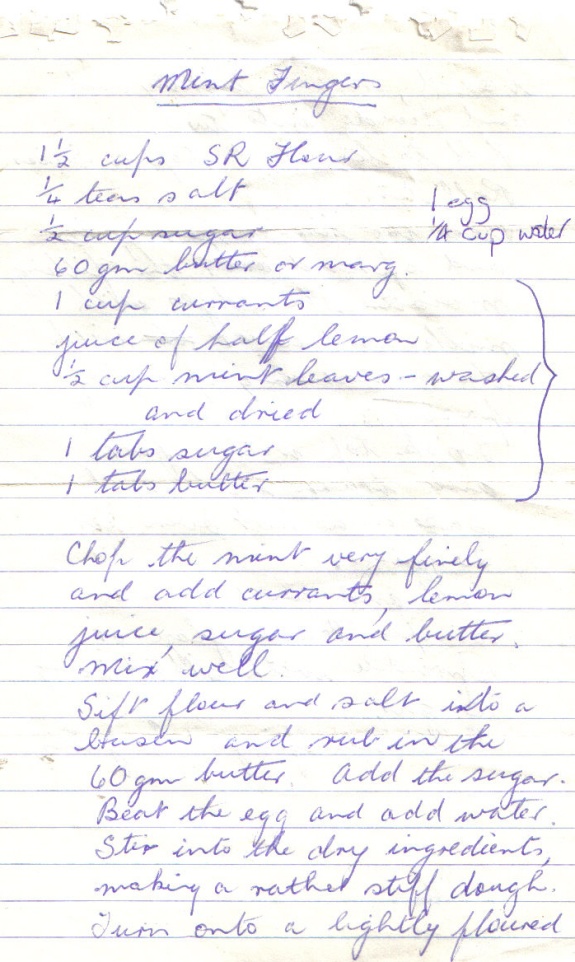 One of the handwritten versions.
She was a great letter writer and I can’t remember her ever using email. When I compared the two versions I had they were both missing a couple of ingredients or directions, but between the two there’s a complete version as presented here.
Ms Onion thinks this recipe should remain a closely guarded family secret but recipes are for sharing – how else do we get that ‘social and personal history’ from food?
Comments or questions? Like my Facebook page.
Mint-fingers
Cooking: 20 minutes
Ingredients:
Filling:
- 1⁄2 cup mint leaves, washed, dried and finely chopped
- 1 cup currants
- Juice of half a lemon
- 1 tablespoon sugar
- 1 tablespoon butter
Dough:
- 1 1⁄2 cups self-raising flour
- 1⁄4 teaspoon salt
- 60 grams butter
- 1⁄2 cup sugar
- 1 egg
- 1⁄4 cup water
- Milk, to brush pastry
Directions
- Preheat the oven to 200°C.
- Combine the mint with the currants, lemon juice, sugar and butter. Mix well
- To make the dough, sift the flour and salt into a basin and rub in the butter. Add the sugar.
- Beat the egg and add water. Stir into dry ingredients to make a rather stiff dough. Turn onto a lightly floured board or benchtop, knead lightly and divide into two.
- Roll out each half to the size of a 20cm by 30 cm swiss-roll tin. Place the lining pastry in the tin and spread over the filling. Moisten the edges with a little milk and cover with the remaining piece of pastry. Prick top with a fork and brush with milk.
- Bake in the oven for 20 minutes.
- Cool and cover with a simple lemon glaze or sprinkle with sifted icing sugar. Cut into finger lengths.
